
In today’s Article we will talk about the famous Adobe Lightroom editing software and we will dive into the it’s amazing features.
We will briefly go over the different features if you are on the fence about using Adobe Lightroom for your go to software.
Please note that we will be talking about Adobe Lightroom Classic for PC or Mac not Adobe Lightroom for Mobile.
No doubt you have heard of this amazing software for photographers but it can be difficult to understand how the software works and navigate through it’s millions of features. We will quickly talk about the main features about this software in this introduction, then we will get in depth on how it can help you.
Lets Roll!!
Adobe Lightroom for Beginners – Introduction
Adobe Lightroom is like having a virtual darkroom and editing studio right at your fingertips. It’s a super versatile and powerful software designed to make your photo organization, editing, and enhancement easy.
Organization
Let’s talk about organization first.
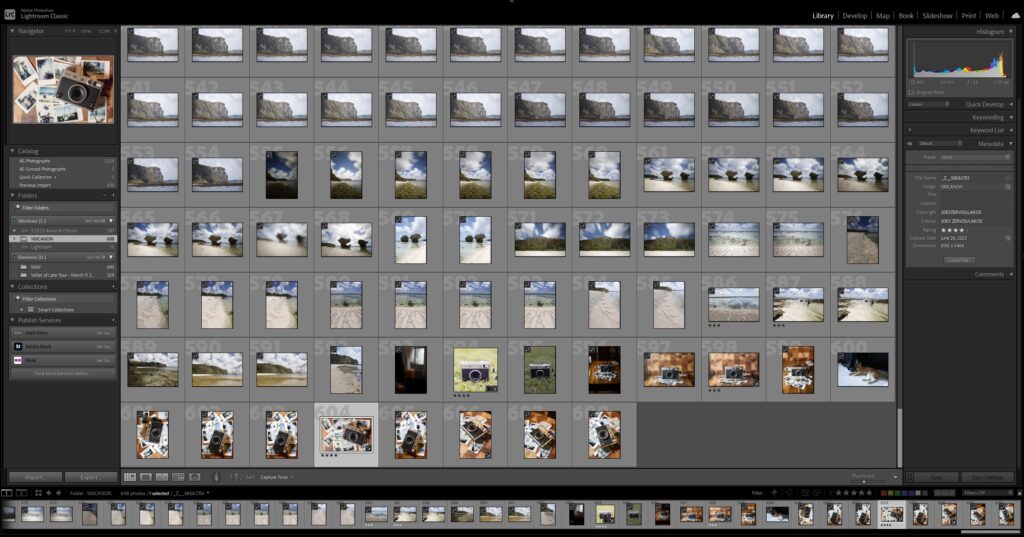
In the Lightroom Library module is great place for keeping your photo library in check. It acts as a centralized hub where you can import, categorize, and search for images with ease. You can create folders, collections, and add keywords to quickly find specific photos or group them based on themes or projects. So no more endless scrolling or searching for that perfect shot you shot of your dog jumping to get his treat.
Editing
Now let’s get into the editing capabilities.
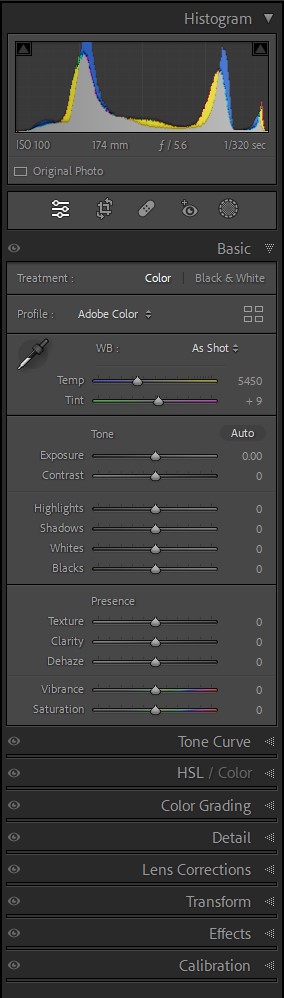
Lightroom is a magician when it comes to making your photos shine. Whether you’re a beginner or a seasoned pro, it offers a wide range of editing tools that give you complete control over your images. In the image to the right, in the basic panel, you can adjust exposure, contrast, white balance, and presence. You can even try more advanced techniques like selective adjustments in the panels below.
The Tone Curve is also a very powerful tool to help you control the brightness and contrast of different tonal ranges, allowing you to create stunning visual effects. Whether you want to add richness and depth or achieve a dreamy, ethereal look, the Tone Curve is your artistic playground in Lightroom.
You can use the Hue Saturation Luminance (HSL) Panel to create stunning travel images, give your photos a unique feel or mood or completely take out all the colors except one for a color splash technique, or simply just a classic Black & White photograph. The HSL Panel gives you full control over the different color ranges as well as their brightness and darkness, along side the saturation slider.
The nice thing about Lightroom is that its all about preserving your original files. It works non-destructively, meaning it never modifies your original images. Instead, it records your editing steps as a series of instructions, so you can always go back to the untouched original or tweak your edits whenever you like. This gives you the freedom to experiment and try out different styles without the fear of messing up your precious shots.
There is so many things you can do with Adobe Lightroom, but with many intuitive sliders and precise controls, you can fine tune every little detail to achieve the exact look you want.
Some Examples below of different styles of editing to get your perfect look. For these images we used presets and did simple adjustments to make them perfect. We will get into presets shortly down below.
Use the Diamond slider to see before and after.
Presets
Now, let’s talk about presets.
Lightroom has a bunch of pre-defined settings that are like quick Instagram filters for your photos, but more. You can adjust every aspect of image after you have used a preset. Presets allow you to apply specific looks or styles with just one click. Want that vintage film effect? Bam! One click and it’s done. However, its not that easy. Sometimes you will have to make small slight adjustments to achieve the desired look you want. You can choose from a wide variety of presets created by other photographers or even create and save your own for future use. They’re a real time-saver and give your photos a consistent and professional touch.
How do you install lightroom presets? Check out our other article How To Install Lightroom Presets that shows you how to do so.
Exporting Photos

Exporting photos from Lightroom is like getting your beautiful photos ready to show the world! It’s the final step to share your artwork with friends, family, or in your social media accounts.
So, after you’ve perfected your photos, it’s time to export.
In the export module , you get to choose where your photos will go. Select the folder or location on your computer where you want them to land. You can even create a new folder right from Lightroom to keep things nice and organized. You can also export a batch of photos for time management.
Now, let’s talk file formats! Lightroom offers a bunch of options to export your images, like JPEG, TIFF, or PNG. JPEG is great for sharing on the web and social media, while TIFF maintains high-quality for printing. And PNG? It’s perfect for images with transparent backgrounds.
Don’t forget about the quality slider! If you’re exporting as JPEG, you can adjust the quality to balance file size and image sharpness. It’s like finding the sweet spot between excellent quality and quick loading times.
Next, let’s set the size and resolution. You can go big for printing or keep it small for web use. Lightroom’s got your back with various size options, making sure your images look their best wherever they end up.
Adding metadata is essential too! You can embed copyright information, your name, contact details, and more right into your photos.
Oh, and don’t forget to name your files! You can choose how your exported files will be named. From simple sequential numbers to more descriptive custom names, you’re the boss.
Lightroom also offers watermarks. Protect your artistic creations by adding a signature or logo, proudly displaying your ownership while sharing your work.
Once you’ve set all the preferences, click that “Export” button, and voila! (You might have to wait a bit if your export a batch of photos) Your photos are ready for the world to admire.
Conclusion
In conclusion, and in my opinion, Adobe Lightroom Classic is a ‘must’ have companion for every photographer, from beginners to seasoned pros. Its user-friendly interface and powerful editing tools make it a joy to use and a creative playground for unleashing your photography potential.
With Lightroom, you can organize and manage your photo library effortlessly, finding specific images in a snap and keeping your work neatly categorized. The editing capabilities are where Lightroom truly shines, allowing you to fine-tune every aspect of your photos with precision and ease. From adjusting exposure and color to adding artistic effects, Lightroom empowers you to bring your creative vision to life.
What’s even more impressive is Lightroom’s non-destructive editing feature. Your original images remain untouched, so you can experiment fearlessly, knowing you can always go back or try different edits without losing any data.
Whether you’re a hobbyist or a professional, Lightroom offers a vast collection of presets and tools to speed up your workflow and achieve consistent, stunning results. You can even create your own presets to add your signature touch to your photos.
With seamless synchronization across devices, you can edit on the go, never missing a moment to perfect your images. And when your photos are ready for the world, Lightroom’s export options ensure you can share them in various formats, sizes, and qualities for printing, social media, or web galleries.
So, if you want to elevate your photography game, Adobe Lightroom is your all-in-one solution for organizing, editing, and showcasing your photographic brilliance. Dive in, explore its magic, and watch your images come alive with creativity and impact. Lightroom is the secret sauce to making your photos truly unforgettable!